Tensorflow 2.0开发最佳实践
https://zhuanlan.zhihu.com/p/163708921
本文不去对比TensorFlow1.0和2.0的差别,而是抛开1.0直接介绍2.0的开发最佳实践,不背包袱。
Eager执行
TensorFlow2.0默认“饥渴执行(eager execution)”,能像pytorch那样立刻看到每一步的执行结果,这个功能对于调试有很大帮助。eager执行有以下特点:
- 符合直觉:跟写python程序一样,并且可以直接使用python的数据结构。
- 容易调试:由于直接执行,可以直接使用python的调试工具。
- 自然的分支控制:可以使用python的分支控制(if, while, for),而不是graph控制流(tf.cond, tf.while_loop)。
tf2.0代码写起来非常符合直觉,跟写普通python代码一样,仅仅是多了一些tf相关的API。请看如下示例:
import tensorflow as tf
print("eager execution: %s" % tf.executing_eagerly())
a = tf.constant(10)
b = tf.constant(1000)
print("a+b=%s" % tf.add(a, b))
执行结果:
使用eager执行还可以很自然的写出复杂的分支逻辑和循环逻辑:
import tensorflow as tf
# tf eager execution完成复杂的分支和循环逻辑
def fizzbuzz(max_num):
  counter = tf.constant(0)
  max_num = tf.convert_to_tensor(max_num)
  for num in range(1, max_num.numpy()+1):
    num = tf.constant(num)
    if num % 3 == 0 and num % 5 == 0:
      print('FizzBuzz')
    elif num % 3 == 0:
      print('Fizz')
    elif num % 5 == 0:
      print('Buzz')
    else:
      print(num.numpy())
    counter += 1
  print("total=%s" % counter.numpy())
fizzbuzz(5)
输出结果:
如果你没有接触过tf1.0版本,肯定会觉得上面的逻辑是很自然的。这就是Eager的好处,每一步的结果都是立即求得的,所以可以像对待普通数值类型那样对待中间结果,看起来就像numpy的ndarray。
计算图执行
Eager执行模式虽然易于理解和调试,但执行效率欠佳,TensorFlow的最佳实践是在开发调试阶段使用Eager执行,在上线阶段采用tf.function创建计算图执行。两种模式的简单对比如下:
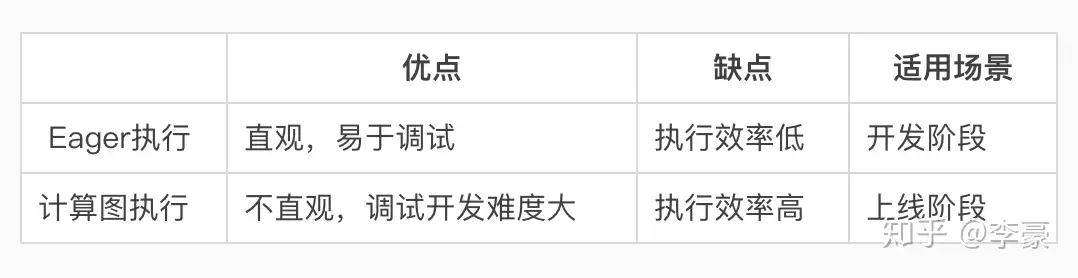
Eager模式和计算图模式对比
什么是计算图?
TensorFlow将整个计算流程表示成一个数据流图,也就是计算图。计算图的边表示数据,节点表示具体计算。计算图保存了全部的计算逻辑,基于这些信息可以进行多种优化,比如无用路径剪枝、常量折叠、并行化等。
举个计算图的栗子,公式 y=a∗x+b 用计算图表示为:
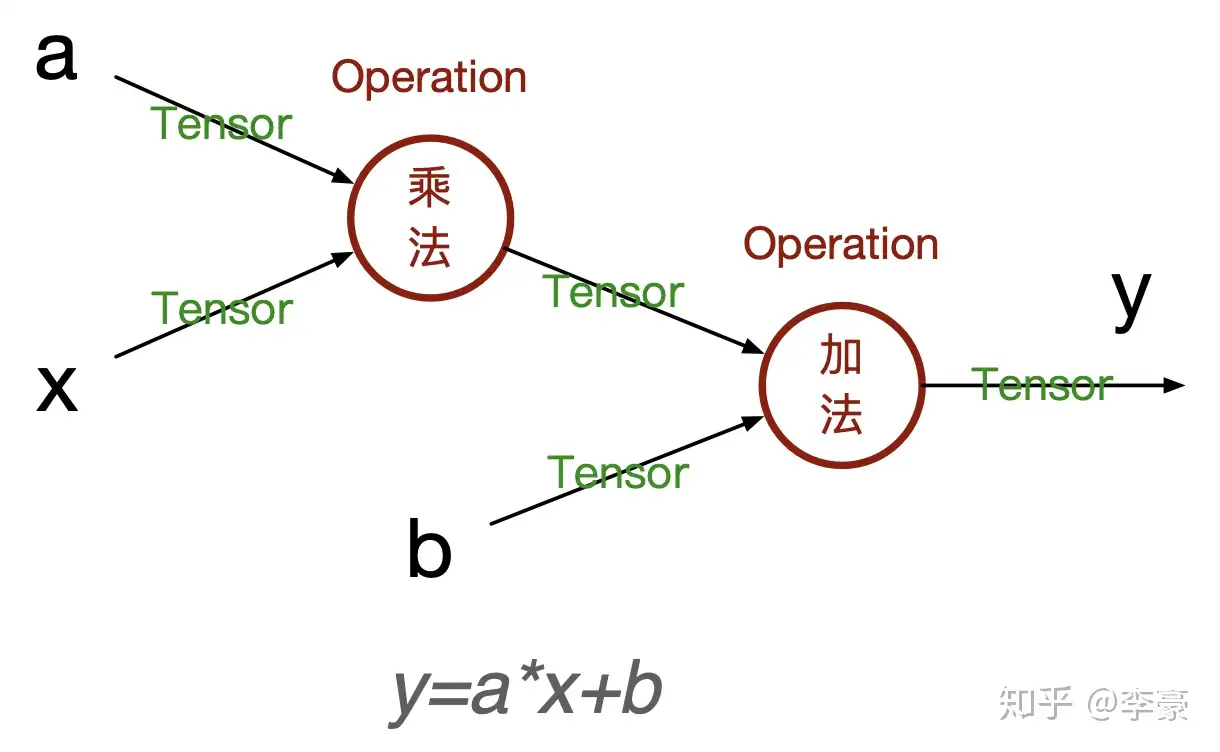
计算图示例
计算图中只有最初的输入节点是已知的值(比如上图中的a,x,b),中间运算的结果在真正计开始算之前都是未知的(比如a和x相乘的结果),仅仅是一个符号而已。
在Eager模式下tf不需要构建计算图,因为每个Operation的都是立即计算。如何将Eager执行的代码转换成计算图执行的代码呢?使用tf.function()包装一下就可以了,tf.function()用于将已有Eager模式的代码转换成计算图模式。示例如下:
import tensorflow as tf

def fn(a, x, b):
    print("eager exectution: %s" % tf.executing_eagerly())
    temp = a * x
    print("temp=%s" % temp)
    y = temp + b
    return y

a = tf.constant(5.0)
x = tf.constant(2.0)
b = tf.constant(100.0)

print(fn(a, x, b)) # eager方式执行
print()
fn_graph = tf.function(fn) # 将fn()转换为计算图模式
print(fn_graph(a, x, b)) # 执行计算图
执行结果:
eager exectution: True
temp=tf.Tensor(10.0, shape=(), dtype=float32)
tf.Tensor(110.0, shape=(), dtype=float32)

eager exectution: False
temp=Tensor("mul:0", shape=(), dtype=float32)
tf.Tensor(110.0, shape=(), dtype=float32)
示例程序表明eager模式和计算图模式有两个明显的差别:
- tf.executing_eagerly()返回值不同,一个是True,一个是False
- 中间结果的打印不同,一个是打印出具体的值,一个打印出tenser的引用。
tf.function还可以以函数注解的方式出现,比如:
import tensorflow as tf

@tf.function # 通过注解方式使用
def fn(a, x, b):
    print("eager exectution: %s" % tf.executing_eagerly())
    temp = a * x
    print("temp=%s" % temp)
    y = temp + b
    return y

a = tf.constant(5.0)
x = tf.constant(2.0)
b = tf.constant(100.0)

concrete_fn = fn.get_concrete_function(a, x, b) # 根据输入类型动态创建对应的计算图
print("\n计算图中的节点:")
for node in concrete_fn.graph.as_graph_def().node: # 访问计算图中的每一个节点
    print("%s: %s -> %s" % (node.op, node.input, node.name))
这一次我们输出了计算图中的每一个节点:
eager exectution: False
temp=Tensor("mul:0", shape=(), dtype=float32)

计算图中的节点:
Placeholder: [] -> a
Placeholder: [] -> x
Placeholder: [] -> b
Mul: ['a', 'x'] -> mul
AddV2: ['mul', 'b'] -> add
Identity: ['add'] -> Identity
基于上述输出可以画出代码中的计算图结构:
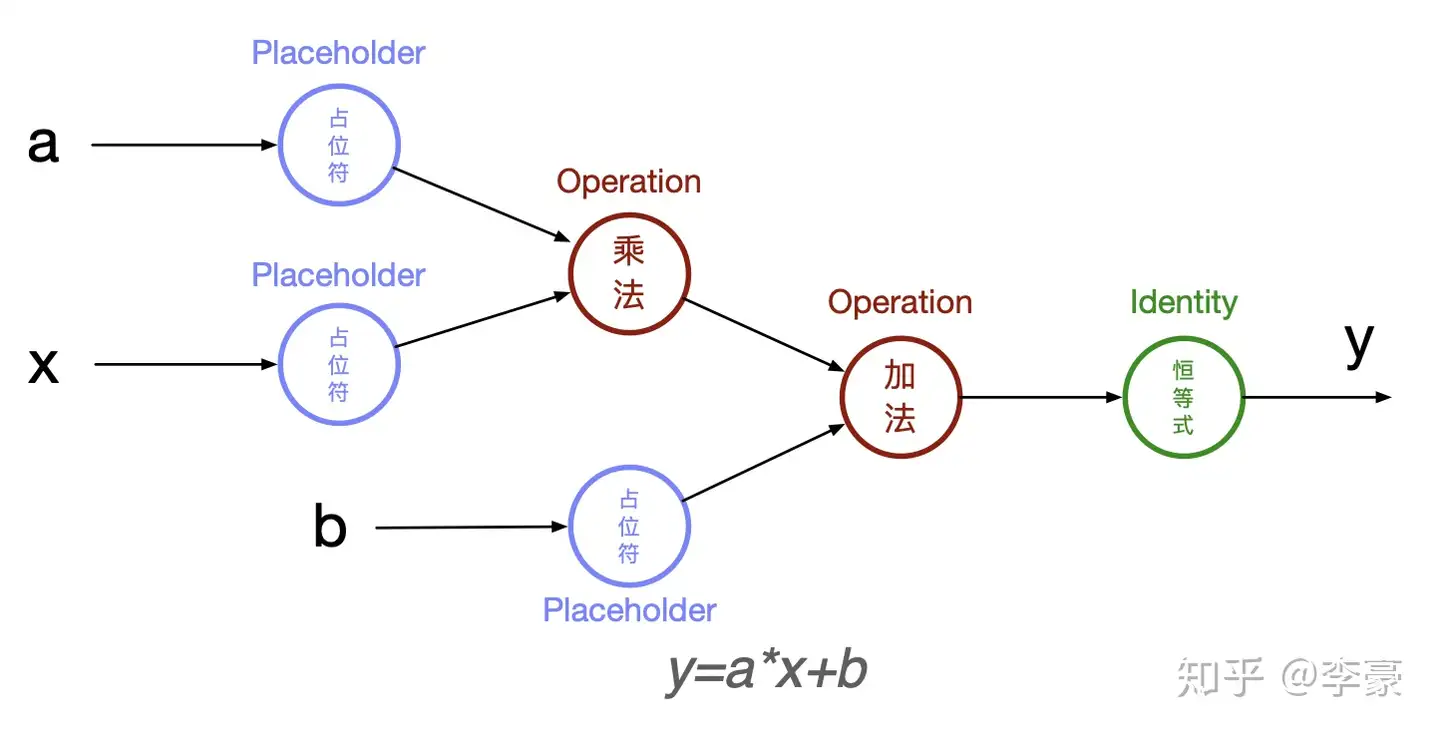
计算图示例
其中Placeholder用于表示喂给计算图的数据,Operation表示具体的计算,最后Identity恒等式用于拷贝结果。
autograph:Eager执行和计算图执行的桥梁
理解了Eager模式和计算图模式的差异就掌握了tf2.0的精髓,但仍然有一点没有搞明白,Eager模式的代码是如何转换成计算图模式的?tf.autograph登场,autograph用于将python代码转换为TensorFlow计算图代码。
autograph: Conversion of plain Python into TensorFlow graph code.
示例如下:
import tensorflow as tf

def fn(a, x, b):
    temp = a * x
    y = temp + b
    return y

graph_code = tf.autograph.to_code(fn) # 将python风格的代码转换成计算图代码
print(graph_code)
转换结果:
def tf__fn(a, x, b):
  do_return = False
  retval_ = ag__.UndefinedReturnValue()
  with ag__.FunctionScope('fn', 'fscope', ag__.ConversionOptions(recursive=True, user_requested=True, optional_features=(), internal_convert_user_code=True)) as fscope:
    temp = a * x
    y = temp + b
    do_return = True
    retval_ = fscope.mark_return_value(y)
  do_return,
  return ag__.retval(retval_)
存在分支和循环逻辑的代码转换会复杂一些,比如if会转换成tf.cond(),while和for会转换成tf.while_loop()等:
import tensorflow as tf

def fizzbuzz(max_num):
  counter = tf.constant(0)
  max_num = tf.convert_to_tensor(max_num)
  for num in range(1, max_num.numpy()+1):
    num = tf.constant(num)
    if num % 3 == 0 and num % 5 == 0:
      print('FizzBuzz')
    elif num % 3 == 0:
      print('Fizz')
    elif num % 5 == 0:
      print('Buzz')
    else:
      print(num.numpy())
    counter += 1
  print("total=%s" % counter.numpy())

graph_code = tf.autograph.to_code(fizzbuzz) # 将python风格的代码转换成计算图代码
print(graph_code)
转换之后的代码比较冗长,有兴趣的同学可以研读一下::
def tf__fizzbuzz(max_num):
  with ag__.FunctionScope('fizzbuzz', 'fscope', ag__.ConversionOptions(recursive=True, user_requested=True, optional_features=(), internal_convert_user_code=True)) as fscope:
    counter = ag__.converted_call(tf.constant, (0,), None, fscope)
    max_num = ag__.converted_call(tf.convert_to_tensor, (max_num,), None, fscope)

    def get_state_3():
      return ()

    def set_state_3(_):
      pass

    def loop_body(iterates, counter):
      num = iterates
      num = ag__.converted_call(tf.constant, (num,), None, fscope)

      def get_state_2():
        return ()

      def set_state_2(_):
        pass

      def if_true_2():
        print('FizzBuzz')
        return ag__.match_staging_level(1, cond_3)

      def if_false_2():

        def get_state_1():
          return ()

        def set_state_1(_):
          pass

        def if_true_1():
          print('Fizz')
          return ag__.match_staging_level(1, cond_2)

        def if_false_1():

          def get_state():
            return ()

          def set_state(_):
            pass

          def if_true():
            print('Buzz')
            return ag__.match_staging_level(1, cond_1)

          def if_false():
            print(ag__.converted_call(num.numpy, (), None, fscope))
            return ag__.match_staging_level(1, cond_1)
          cond_1 = num % 5 == 0
          ag__.if_stmt(cond_1, if_true, if_false, get_state, set_state, (), ())
          return ag__.match_staging_level(1, cond_2)
        cond_2 = num % 3 == 0
        ag__.if_stmt(cond_2, if_true_1, if_false_1, get_state_1, set_state_1, (), ())
        return ag__.match_staging_level(1, cond_3)
      cond_3 = ag__.and_(lambda : num % 3 == 0, lambda : num % 5 == 0)
      ag__.if_stmt(cond_3, if_true_2, if_false_2, get_state_2, set_state_2, (), ())
      counter += 1
      return counter,
    counter, = ag__.for_stmt(ag__.converted_call(range, (1, ag__.converted_call(max_num.numpy, (), None, fscope) + 1), None, fscope), None, loop_body, get_state_3, set_state_3, (counter,), ('counter',), ())
    print('total=%s' % ag__.converted_call(counter.numpy, (), None, fscope))
现在来回答刚才的问题:Eager模式的代码是如何转换成计算图模式的? tf.function底层通过tf.autograph自动将eager模式的python代码转换成计算图模式,并在函数调用时触发计算图的执行,之后返回计算结果。
总结
Tensorflow 2.0有两种执行模式:Eager模式和计算图模式,Eager模式符合直觉、易于调试,计算图模式执行效率更高。TensorFlow的最佳实践是在开发调试阶段使用Eager执行,在上线阶段采用tf.function创建计算图执行。两种执行模式的转换通过tf.function注解完成,底层代码转换借助tf.autograph。
一个有意思的事情是经过tf.function注解装饰的函数支持多态,既每次函数调用的输入的类型和shape可以不同,tf底层会根据输入参数的dtype和shape自动创建相应的计算图,并通过缓存方式避免相同类型的计算图重复创建。