TVM快递入门
https://zhuanlan.zhihu.com/p/443276639#:~:text=TVM%E5%8F%AF%E4%BB%A5%E5%81%9A%E4%BB%80%E4%B9%88%201%20%E4%BD%9C%E4%B8%BA%E4%BD%BF%E7%94%A8%E8%80%85%EF%BC%9A%20%E4%BD%BF%E7%94%A8TVM%E5%AF%BC%E5%85%A5%E8%AE%AD%E7%BB%83%E5%A5%BD%E7%9A%84%E6%A8%A1%E5%9E%8B%EF%BC%8C%E8%BF%9B%E8%A1%8C%E4%BC%98%E5%8C%96%EF%BC%8C%E7%BC%96%E8%AF%91%E5%88%B0%E7%89%B9%E5%AE%9A%E7%9B%AE%E6%A0%87%E5%B9%B3%E5%8F%B0%EF%BC%8C%E8%BF%90%E8%A1%8C%E6%A8%A1%E5%9E%8B,2%20%E4%BD%9C%E4%B8%BA%E5%BC%80%E5%8F%91%E8%80%85%EF%BC%9A%20%E7%BB%9D%E5%A4%A7%E9%83%A8%E5%88%86%E4%BD%BF%E7%94%A8%E8%80%85%E5%85%B6%E5%AE%9E%E4%B9%9F%E6%98%AFTVM%E7%9A%84%E5%BC%80%E5%8F%91%E8%80%85%E3%80%82%20%E5%BC%80%E5%8F%91%E8%80%85%E4%BD%BF%E7%94%A8TVM%E9%80%9A%E5%B8%B8%E6%98%AF%E4%B8%BA%E4%BA%86%E6%94%AF%E6%8C%81%E6%96%B0%E7%9A%84%E7%A1%AC%E4%BB%B6%E5%B9%B3%E5%8F%B0%EF%BC%8C%E4%B8%BA%E6%AD%A4%E9%99%A4%E4%BA%86%E6%B7%BB%E5%8A%A0%E6%96%B0%E7%9A%84%E5%90%8E%E7%AB%AF%EF%BC%8C%E4%B8%80%E8%88%AC%E4%B9%9F%E9%9C%80%E8%A6%81%E9%85%8D%E5%A5%97%E6%89%A9%E5%B1%95%E5%AF%B9%E5%BA%94%E7%9A%84%E7%AE%97%E5%AD%90%E4%BB%A5%E5%8F%8A%E8%B0%83%E5%BA%A6%E7%AD%96%E7%95%A5%E7%AD%89%E3%80%82
TVM是一个端到端的机器学习编译框架,它的目标是优化机器学习模型让其高效运行在不同的硬件平台上。 它前端支持TensorFlow, Pytorch, MXNet, ONNX等几乎所有的主流框架。 它支持多种后端(CUDA,ROCm,Vulkan,Metal,OpenCL,LLVM,C,WASM)及不同的设备平台(GPU,CPU,FPGA及各种自定义NPU)。
TVM可以做什么
- 作为使用者: 使用TVM导入训练好的模型,进行优化,编译到特定目标平台,运行模型
- 作为开发者: 绝大部分使用者其实也是TVM的开发者。开发者使用TVM通常是为了支持新的硬件平台,为此除了添加新的后端,一般也需要配套扩展对应的算子以及调度策略等。
模型编译运行的基本步骤

\1. 导入其他框架的模型 2. 将该模型转换成Relay(TVM的高层级IR). Relay支持特性: - 传统数据流式的表示 - 函数式语言风格的表示 - 两种风格的混合 Relay 能够进行图层次的优化 3. 将Relay转换成更细粒度的Tensor Expression(TE) Relay使用FuseOps 将模型划分成小的子图,在此过程中可以使用一些schedule原语进行优化(如tiling, vectorization, parallelization, unrolling, and fusion) TOPI包含一些预定义的常用Operator。
- 搜索最佳调度策略(AutoTVM或AutoScheduler) -AutoTVM: 模板化的自动调优模块。 常用算子的搜索模板也在TOPI中提供. -AutoScheduler (a.k.a. Ansor): 无模板的自动调优模块,自动生成搜索空间
- 选择模型编译的最优配置。 自动调优会生成JSON格式的优化记录.
- 编译生成Tensor IR (TVM的低层级IR,相对于Relay)。 TVM支持的后端包括:
- LLVM, 通过它可以生成llvm支持的所有硬件如x86, ARM.
- 特定编译器,如NVCC, NVIDIA的编译器.
- 通过BYOC(Bring Your Own Codegen)框架实现
- 编译生成机器代码。 TVM可以将模型编译成可链接的对象模块来通过轻量级的运行时来运行。 它提供多种语言的支持。TVM也支持将模型和运行时统一打包。
示例代码
"""
使用TVM的python API来进行模型的编译、运行和优化
"""
import onnx
from tvm.contrib.download import download_testdata
from PIL import Image
import numpy as np
import tvm.relay as relay
import tvm
from tvm.contrib import graph_executor

###############################################################################
# 获取一个预训练的模型(使用了一个ONNX格式的模型)和测试图片
model_url = "".join(
    [
        "https://github.com/onnx/models/raw/",
        "master/vision/classification/resnet/model/",
        "resnet50-v2-7.onnx",
    ]
)

model_path = download_testdata(model_url, "resnet50-v2-7.onnx", module="onnx")
onnx_model = onnx.load(model_path)
img_url = "https://s3.amazonaws.com/model-server/inputs/kitten.jpg"
img_path = download_testdata(img_url, "imagenet_cat.png", module="data")
# Resize it to 224x224
resized_image = Image.open(img_path).resize((224, 224))
img_data = np.asarray(resized_image).astype("float32")
# Our input image is in HWC layout while ONNX expects CHW input, so convert the array
img_data = np.transpose(img_data, (2, 0, 1))
# Normalize according to the ImageNet input specification
imagenet_mean = np.array([0.485, 0.456, 0.406]).reshape((3, 1, 1))
imagenet_stddev = np.array([0.229, 0.224, 0.225]).reshape((3, 1, 1))
norm_img_data = (img_data / 255 - imagenet_mean) / imagenet_stddev
# Add the batch dimension, as we are expecting 4-dimensional input: NCHW.
img_data = np.expand_dims(norm_img_data, axis=0)

###############################################################################
# 使用Relay来编译模型
target = "llvm"
input_name = "data"
shape_dict = {input_name: img_data.shape}
mod, params = relay.frontend.from_onnx(onnx_model, shape_dict)
with tvm.transform.PassContext(opt_level=3):
    lib = relay.build(mod, target=target, params=params)
dev = tvm.device(str(target), 0)
module = graph_executor.GraphModule(lib["default"](dev))

######################################################################
# 使用TVM Runtime运行模型
dtype = "float32"
module.set_input(input_name, img_data)
module.run()
output_shape = (1, 1000)
tvm_output = module.get_output(0, tvm.nd.empty(output_shape)).numpy()
#~~~~~~~~~~~
# 评估基本的性能数据
import timeit
timing_number = 10
timing_repeat = 10
unoptimized = (
    np.array(timeit.Timer(lambda: module.run()).repeat(repeat=timing_repeat, number=timing_number)) * 1000 / timing_number
)
unoptimized = {
    "mean": np.mean(unoptimized),
    "median": np.median(unoptimized),
    "std": np.std(unoptimized),
}
print(unoptimized)
#~~~~~~~~~~
# 后处理
from scipy.special import softmax
# Download a list of labels
labels_url = "https://s3.amazonaws.com/onnx-model-zoo/synset.txt"
labels_path = download_testdata(labels_url, "synset.txt", module="data")

with open(labels_path, "r") as f:
    labels = [l.rstrip() for l in f]
# Open the output and read the output tensor
scores = softmax(tvm_output)
scores = np.squeeze(scores)
ranks = np.argsort(scores)[::-1]
for rank in ranks[0:5]:
    print("class='%s' with probability=%f" % (labels[rank], scores[rank]))
#~~~~~~~~~~~
# 输出结果
#     # class='n02123045 tabby, tabby cat' with probability=0.610553
#     # class='n02123159 tiger cat' with probability=0.367179
#     # class='n02124075 Egyptian cat' with probability=0.019365
#     # class='n02129604 tiger, Panthera tigris' with probability=0.001273
#     # class='n04040759 radiator' with probability=0.000261

################################################################################
# 使用autotvm来优化模型
import tvm.auto_scheduler as auto_scheduler
from tvm.autotvm.tuner import XGBTuner
from tvm import autotvm
#~~~~~~~~~~~
# 基本配置参数
number = 10 # 尝试的不同优化配置的数目
repeat = 1  # 每个配置重复测量的次数
min_repeat_ms = 0  # 最小运行时间,影响GPU精度调优,CPU设置为0
timeout = 10  # 超时时间
# create a TVM runner
runner = autotvm.LocalRunner(
    number=number,
    repeat=repeat,
    timeout=timeout,
    min_repeat_ms=min_repeat_ms,
    enable_cpu_cache_flush=True,
)
#~~~~~~~~~~~~
# 优化选项
# tuner: 这里使用xgboost作为优化算法
# trials:对于产品级的模型,trials推荐值为CPU 1500, GPU 3000-4000. 这个是模型和处理器相关的。
#         需要多花时间实验。这里作为简单测试,仅设置为10
# Tearly_stopping:尝试最小次数
# measure_option: 构建运行选项
# tuning_records: 输出的优化记录文件
tuning_option = {
    "tuner": "xgb",
    "trials": 10,
    "early_stopping": 100,
    "measure_option": autotvm.measure_option(
        builder=autotvm.LocalBuilder(build_func="default"), runner=runner
    ),
    "tuning_records": "resnet-50-v2-autotuning.json",
}
# begin by extracting the taks from the onnx model
tasks = autotvm.task.extract_from_program(mod["main"], target=target, params=params)
# Tune the extracted tasks sequentially.
for i, task in enumerate(tasks):
    prefix = "[Task %2d/%2d] " % (i + 1, len(tasks))
    tuner_obj = XGBTuner(task, loss_type="rank")
    tuner_obj.tune(
        n_trial=min(tuning_option["trials"], len(task.config_space)),
        early_stopping=tuning_option["early_stopping"],
        measure_option=tuning_option["measure_option"],
        callbacks=[
            autotvm.callback.progress_bar(tuning_option["trials"], prefix=prefix),
            autotvm.callback.log_to_file(tuning_option["tuning_records"]),
        ],
    )
#~~~~~~~
# 输出:
#   # [Task  1/24]  Current/Best:   10.71/  21.08 GFLOPS | Progress: (60/1000) | 111.77 s Done.
#   # [Task  1/24]  Current/Best:    9.32/  24.18 GFLOPS | Progress: (192/1000) | 365.02 s Done.
#   # [Task  2/24]  Current/Best:   22.39/ 177.59 GFLOPS | Progress: (960/1000) | 976.17 s Done.
#   # [Task  3/24]  Current/Best:   32.03/ 153.34 GFLOPS | Progress: (800/1000) | 776.84 s Done.
#   ....
#   # [Task 24/24]  Current/Best:   25.03/ 146.14 GFLOPS | Progress: (1000/1000) | 1112.55 s Done.

################################################################################
# 编译优化后的模型
with autotvm.apply_history_best(tuning_option["tuning_records"]):
    with tvm.transform.PassContext(opt_level=3, config={}):
        lib = relay.build(mod, target=target, params=params)

dev = tvm.device(str(target), 0)
module = graph_executor.GraphModule(lib["default"](dev))

#~~~~~~~~~
# 校验优化模型的结果
dtype = "float32"
module.set_input(input_name, img_data)
module.run()
output_shape = (1, 1000)
tvm_output = module.get_output(0, tvm.nd.empty(output_shape)).numpy()

scores = softmax(tvm_output)
scores = np.squeeze(scores)
ranks = np.argsort(scores)[::-1]
for rank in ranks[0:5]:
    print("class='%s' with probability=%f" % (labels[rank], scores[rank]))

#~~~~~~~~~
# 评估性能
import timeit
timing_number = 10
timing_repeat = 10
optimized = (
    np.array(timeit.Timer(lambda: module.run()).repeat(repeat=timing_repeat, number=timing_number)) * 1000 / timing_number
)
optimized = {"mean": np.mean(optimized), "median": np.median(optimized), "std": np.std(optimized)}

print("optimized: %s" % (optimized))
print("unoptimized: %s" % (unoptimized))
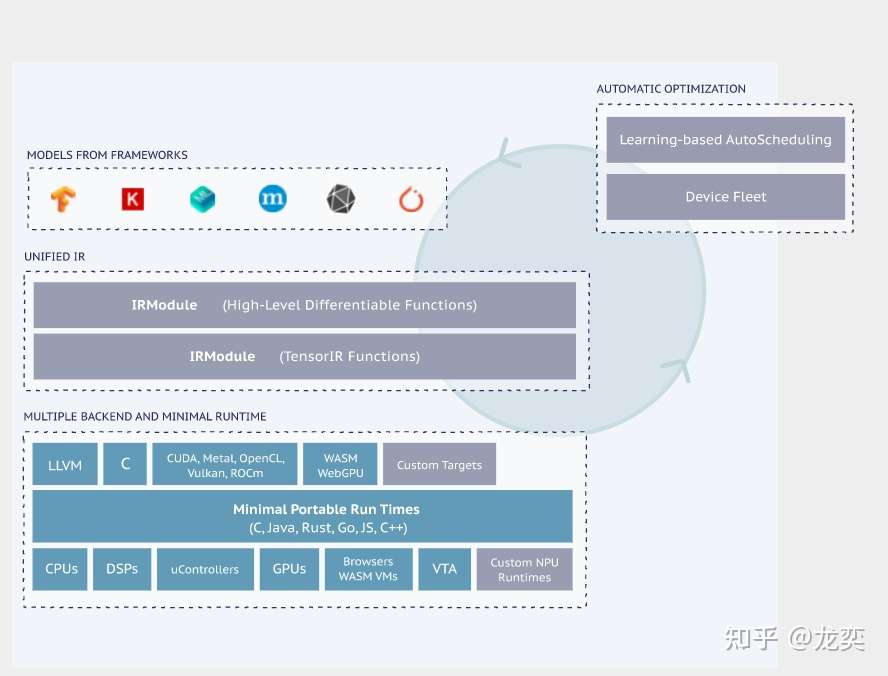
附: TVM框图和核心概念
- Frontends: TVM支持的前端,对接各大深度学习框架 - IR: immediate representation, 编译器使用的中间表示数据结构,在TVM中有Relay和TIR两个不同抽象层次的IR。 - Relay: TVM中抽象程度较高的IR,可以通过不同深度学习框架前端转换对应的预训练模型 - TIR: Tensor-lever IR,相对于Relay,TIR更偏向于底层,可表示基本的数学运算,更易于底层硬件的优化 - TE: Tensor expression,TVM使用TE来定义计算、进行优化。TE使用函数式编程来描述计算,每个算子都能用TE来表示 - TOPI: TVM Operator Inventory, TVM中提供了numpy风格的高级抽象算子。TOPI中提供了针对主流平台(x86,ARM,CUDA,ROCm等)的神经网络常用算子实现。
- AutoTVM: TVM中模板化的自动优化方法,它通过提供调度模板,自动搜索模板中定义的参数空间来优化模型和计算。
- AutoScheduler(Ansor): TVM中无模板的优化方法,和AutoTVM相比,它无需手动编写调度模板。
- IRModule:它是TVM中表示IR的核心数据结构。我们可以通过调度原语(Schedule Primitives)和传递优化(Passes)对其进行变换(transform).
- Pass:传递给IRModuel的变换和优化策略,比如常量折叠,算子融合,布局变换等等
DSA